dennis
Members
-
Joined
-
Last visited
-
Hello, my name is dennis and I'm part of an offroading group and we are currently in a debate regarding trail communication and would like some advice. The current standby for our club and probably most of the off-road world is the CB radio. However, that standard is always being challenged by two-way handhelds like FRS. In polling our members the pluses for CB’s are: Standard for 4x4 world Always in the Vehicle mounted (you can’t “forget” it) Can be mounted/installed with the optimum in convenience and audio clarity. Many of us added external speakers and some mount their mike on a retractable cord. The minuses for CB’s: Need to install and tune Not easy to “borrow” a CB if needed quickly Extra expense for an antenna The pluses for FRS; Excellent for out of the vehicle communication (as long as people carry it) Easy to borrow one if needed Good when traveling to a trail with people that trailer their Offroad vehicles. Doesn’t do them any good on the road if their CB is mounted in the vehicle thats on the trailer Appears to be less expense than a CB (not sure about this one) The minuses for FRS radios: Biggest complaint is volume/audio quality when in the Vehicle. Especially some of us with Jeeps and with the top down on the highway. Most people just put them on the seat or console and they get bounced around and end up on the floor when you need it. I hope you can help us is solving the #1 minus for FRS, volume/audio quality. So first, what FRS radios would you recommend that have the best audio quality/volume (stand alone)? Second, what accessories like external mike/speakers or headset booms would you recommend? Thanks in advance…
-
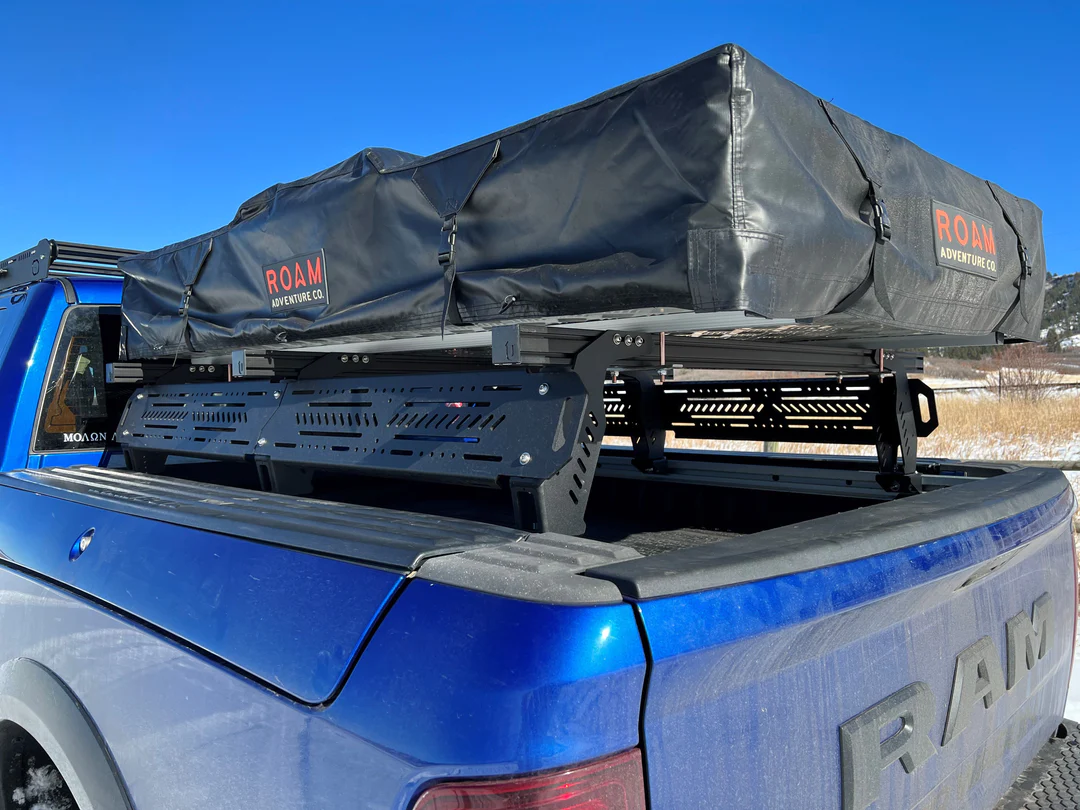
I am thinking of using my Ram to overland with but not sure about the investment to make it an overlanding vehicle This is what I was thinking First is a rack for the back to hold a roof top tent, max trax, water cans, probably gas cans (cause she’s a thirsty bitch), cooler/fridge, etc.. Let’t look at options for a RACK that can be used for a Ram with the Rambox. OPTION 1 This is a rack provided by Nuthouse and it looks very nicely built. They have a ton of addons but the negative is they are pricey. Nutzo -RAMBOX series Overlanding truck rack can be made for all model year Rambox. The RAMBOX rack is offered in a square tube design (The RAMBOX2) and is all aluminum. This truck bed rack has been designed around the RAMBOX cargo management system to allow full access to the storage. These racks mount to factory holes and require no drilling into the truck. This bed rack is offered in a Low Profile version, Standard Height and cab height. The Standard height is at the optimal height to work with your Roof Top Tent (RTT) Annex. These racks can also incorporate our aluminum retractable and lockable tonneau cover or aluminum hard deck. This will keep your bed secure and dry. Options include Light Package Deluxe light package includes: 1-CHMSL, 2- VisionX White accent lights, 4- Yellow marker lights, 2- Red marker lights, 4- VisionX Dura M460 2.75” square LED flood lights. All of our lights are wired with 12-14 gauge double sheathed marine grade wire and include 5 foot long wires Deluxe Light Package ($1,495.00) CHMSL,Third Brake Light LED 3/4” button light (not DOT approved) ($235.00) Cargo bed light under rack, includes extra wire and weather pack connection ($235.00) LED marker lights, (2) amber & (4) red, includes wire and weather pack ($525.00) Two VisionX Dura Mini Lights ($325.00) Four VisionX Dura Mini Lights ($678.00) Removable Crossbars Removable Crossbars allow full access and versatility to the bed of your truck. Extra removable crossbars can be made to hold/mount many additional items. You can have different bars for different mounting solutions that can be changed out in minutes. Pricing includes additional finish time and material to coat parts Removable Crossbars ($1,649.00) Extra Removable Crossbars (each) ($385.00) Hard Deck Options The all aluminum hard deck creates a secure and weather proof area for all of your gear. The 1/8″ aluminum sheet is reinforced with 1”x 3” cross bars. It is a sturdy platform for all of your exterior storage needs. The deck also provides a great place to store a 40” spare tire. There are 2 multi-directional vents (optional) located towards the cab to promote cross ventilation inside the bed. Hard Decks are priced per build due to oversized aluminum cost. Aluminum Hard Cover Deck (Short Bed) ($3,299.00) Aluminum High Clearance Hard Cover Deck (Short Bed) ($3,899.00) L-Track tie down ($250.00) Retractable Aluminum Coiling Cover USA made aluminum powdercoated, retractable, and lockable cover Short Bed ($2,579.00) Long Bed ($2,679.00) Tire Shelf A Large sheeted deck that is designed to accommodate a tire up to 40″ and still provide extra space for storing gear. Large Shelf with 4 pin mounting ($1,100.00) Accessory rails for tire shelf. Priced per side ($300.00) Awning mount Custom fabricated awning mounts for 270 style awning ($395.00) Maxtrax Storage Box All aluminum storage box for Maxtrax brand only. These boxes make it easy to slide traction boards in and out. The hinged door has a hole for a carabiner or pad lock. These boxes can be mounted to the underside of the rack or anywhere else you’d like to store your traction boards. Maxtrax Box for 2 boards ($549.00) Maxtrax Box for 4 boards ($549.00) Maxtrax Traction Aides MKII Safety Orange ($299.00) Black ($299.00) Blaze Yellow ($299.00) Olive Drab ($299.00) Desert Tan ($299.00) Gunmetal Grey ($299.00) FJ Red ($299.00) Average Cost: $3000-$3400 (without options, without tent) OPTION 2 Another option is TRUSS Rack. Not as expensive which is a positive but not cheap by any means. Option 1 has a ton more options so if you like to keep your options open to add later then you may want to stay with OPTION 1. The TRUSS systems mounts to the factory cargo rails inside your Ram's truck bed. Please make sure you have the proper cargo rails installed prior to the TRUSS bed rack. Ram's OEM Rambox Tonneau rails have two slots in them. One facing the inside of the bed and one facing the sky. You will use both slots for attachment of the TRUSS bed rack. If you do not have the exact pictured rails, the provided feet will not work with you truck. Please reach out as needed for clarification and factory rail part numbers can be provided so you can order them from Mopar if needed. THIS TRUSS IS NOT COMPATIBLE WITH TONNEAU, SOFT TOPS, OR ANY BED COVERS. Included (6) TRUSS Legs (6) Steel Mounting Feet (4) Side Armor Plates (3) 2" X 2" Load Bars (1) All required fasteners, washers, lock nuts, and spacers are included in the kit. Average Cost: $2000 (only rack) OPTION 3 This is my favorite but also most expensive option. It’s called the Treehouse from snap outlanders and if you want “the best” then this is what you want. Each Treehouse is built to order, built to the specs of your truck, fully aluminum, and a combination of tig-welded & riveted. Standard Treehouse Includes: - Matte black powder coat - Third brake light - Meteor Grey canvas with two side flaps with three layers (clear, screen, and outer) - Single rear door with gas struts (Flip up) - Four side doors with gas struts (Flip up, two on each side) - Seals on all doors - Sleeping platform (75inx53in) that can be raised all the way up - Electrical outlets (Two USB, one 12v cigarette outlet; Must be powdered by an external power station) - Carpeted sleeping platform & ceiling of wedge - Double sized, three inch thick memory foam mattress - Two T-Tracks on the roof - Insulated roof - Ladder to access sleeping platform - Bed rail clamps for installation - Truck cap seal for base - Guaranteed watertight sleeping area (does not include the base/truck bed area) - Complimentary install at our facility in Pennsylvania + accessories for install Average Cost: $12,000 (min of 6month lead time but includes rack, tent, etc)


-
By far, the best smoked salmon recipe I have tried.
-
By far, the best smoked salmon recipe I have tried.
-
I followed this recipe for our turkey this year and some of the pickest eaters said this was the best turkey "THEY EVER HAD" I will be using this recipe next year for sure. It was VERY VERY delicious. I used Apple wood chunks I stuck in the corners of the BGE that would smolder eventually and I cooked at 275 for about 4 hours. Every hour I sprayed with Canola Oil to help keep that skin crispy. I used the Killer Hogs A.P. seasoning and Zataranns Creole Seasoning.
- 1 comment
- 2 reviews
-
dennis changed their profile photo
-
Rental from Enterprise
-
Some more info. When I replaced our furnace I mentioned I wanted zones so I could get heat over to the two end bedrooms since they are freezing cold. The gentleman at Holland Heating and Cooling recommended a variable speed furnace (Tran XV95) this would be less expensive and how it works is the blower motor works on 220 and blows at full speed when the demand needs it (like furnace kicks on to blow heat or A/C) but when the thermostat registers you have reached the desired set temp then the blower motor goes to an idle mode where it is still circulating air but uses the low draw of a 12v system. Of course this hasn’t been working and I stopped by today to get more air filters the gentleman said the thermostat can’t be set to auto but instead needs to be set to on. I took a picture of the thermostat before I left the house and it was set to auto. So now the fan is set to on and we’ll see if it works as advertised. the reason this is important is when I get the wood stove installed on the 23rd I need the air to circulate from downstairs to all the house in the winter.
-
My wife and I are freezing our asses off in our own home unless I crank the furnace up to 68 degrees which is crazy to think. I remember as a kid we were never cold in the house but we always had a wood burner in the home (most of the homes it was in the basement). It would get some warm in the house that windows had to be opened in the home in the middle of winter to let out some of the hot and let in some of the cool weather. So now I'm a grown up and freezing my ass off in this home that was built in the 60's I thought of applying the same thought process that worked when I was a kid. Get a wood burner in the basement. I originally wanted to replace the wood stove upstairs that came with the home since it doesn't put out a lot (or really any) heat. Especially since we spend most of our time in the living room upstairs but when they came out to look at what we have they pointed out that we should stop using it Immediately. Apparently whoever put the wood insert in trimmed the outside of it with wood trim which is charred on the back from burning from the heat of the wood stove. So in short, its about to start on fire like charcoal. To correct the hearth that is too short, all the wood trim, wood mantle, etc I'm looking close to $10,000 so probably not going to happen. My thought was to pull it out and put a gas stove/insert in its place so I don't have to do as much work. The company I talked to said they could pull the stove out for $400 but some serious cost to fix everything. That will have to be maybe next year. Since upstairs is a bust, concentrating on the downstairs which uses the same chimney so its directly below the living room. My thought is it would at least warm the wood floors in the winter and give the impression its warmer. And we do know that warm air rises so there is a good chance it could heat most of the 1800 sq ft 1960 home on half basement and half crawl (the crawl space is below all the bedrooms) I was bouncing back and forth between a Lopi and a Blaze King for manufacturers of wood stove. My parents has a Lopi wood stove and it was there favorite of all the brands they had but that was a long time ago before they started getting strict with emissions. Researching burn times and warranty information the Blaze King on paper is the clear winner so I chose a Blaze King Princess Insert which will get installed on the 23rd of January 2018 (brochure is attached along with manual) OM-PI1010A-E.pdf BlazeKingInserts_Broch.pdf
-
This is also worth watching to show the possibility of robots
-
Check out the top 5 Robots that you can own in your own today
-
Check this out. Shows you how to get groceries using robots
-
A must stop if you have a square body looking for offroad parts. They are very helpful and willing to answer questions on how they can help you achieve your goals. If you look around the internet at builds, they are usually getting many parts for there square body truck from DIY4x

-
 So if you are working with Legs (Drums) then you should give this a shot. Too dang cold in the middle of winter to cook them on the BGE so I'm forced to use the oven Place the chicken parts with the skin on in a plastic bag and pour the buttermilk in to coat. Squeeze the air out of the bag and seal. Massage the chicken and buttermilk with your hands to coat evenly and allow to marinate in the refrigerator for 30 minutes minimum up to several hours. Preheat your oven to 425°F. In a medium sized bowl using a whisk, mix together the flour, Panko, baking powder and 11 herbs and spices. Set aside. Place a 13x9” baking dish in the oven to get hot for at least 15 minutes (See Note 2). While pan is heating up remove the chicken from the buttermilk, shaking off excess, and dredge in the seasoned flour mixture (See Note 3), coating on all sides with one hand. Add the melted butter to the heated baking dish and arrange the chicken pieces on top with plenty of room on each side so they “fry” not "steam". Bake for 12 minutes, uncovered. Turn the chicken pieces over and bake another 12 minutes or until internal temperature reads 165°F. Remove from oven and allow to rest 5 minutes and then serve. Recipe Notes I use all parts of a chicken fryer (breasts, wings, thighs and legs). The photos show chicken drumsticks only. Avoid glass bakeware as oven temperature and adding of liquid (melted butter) is not something advised per most manufacturers instruction on care. When dredging I keep one hand for the wet part and the other for the dry part. This avoids getting clumpy fingers on both hands.
 -
Wow, Kert at DIY4x responds pretty quick to online questions. Seriously like less than 5minutes he also suggested moving the axle forward. But how? A. Drilling the Spring Perches B. Easy Inch Kit Pretty sure if I could move it just one inch forward I would be good but whats the best route? for my lack of confidence I lean towards the easy inch kit which is a plate under your springs that will offset your axle forward roughly an Inch


-
Occasionally I have to rent a vehicle and when you go to the Kansas City Airport and rent from National you get a pretty nice selection. This week I chose a new 2017 Chevy Colorado. My sister has one and she likes it. Video Coming Soon